Earlier this year, colleagues from the HPCC Systems Center of Excellence in Cognitive Intelligent Systems for Sustainable Solutions were tasked with the challenging initiative to support a startup company based out of Atlanta in exploring HPCC Systems across various cloud platforms, including extensive exploration with AWS (Amazon Web Services).
As a result of this initiative, they had the chance to revisit and optimize the steps required to deploy HPCC Systems using AWS Elastic Kubernetes Service (EKS).
This blog compiles and presents their updated deployment method using a step-by-step approach, as outlined below:
- Pre-requisites
- Create an AWS account if you don’t have one.
- Create the IAM user and add policies for create/manage EKS
- Download and configure the AWS CLI, eksctl, kubectl, helm, and git
- Deployment steps
- Deploy the EFS service
- Deploy an EKS cluster
- Deploy Amazon EFS CSI driver and external provisioner for Amazon EFS
- Deploy the HPCC Systems cluster
Pre-requisites
Creating an AWS account
If you do not have an AWS account, create one using the AWS Management Console.
Once you log in to your AWS account, navigate to the Console page, select your account, and open “Security Credentials”, which will take you to the Identity and Access Management (IAM) Page.
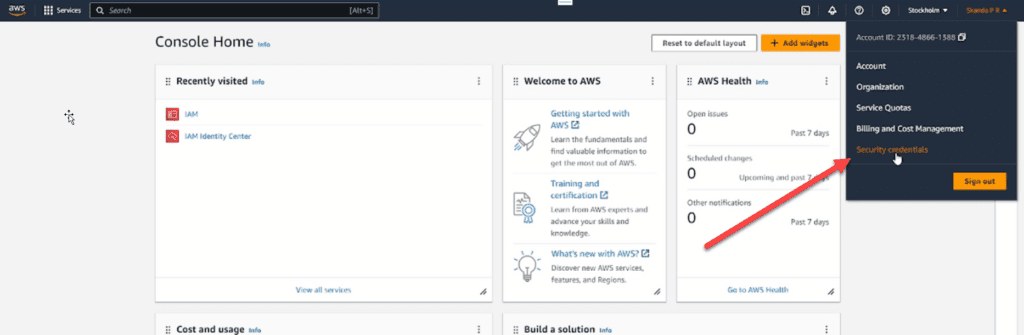
From here you need to enable the Multi Factor Authentication by using an application like Google Authenticator.
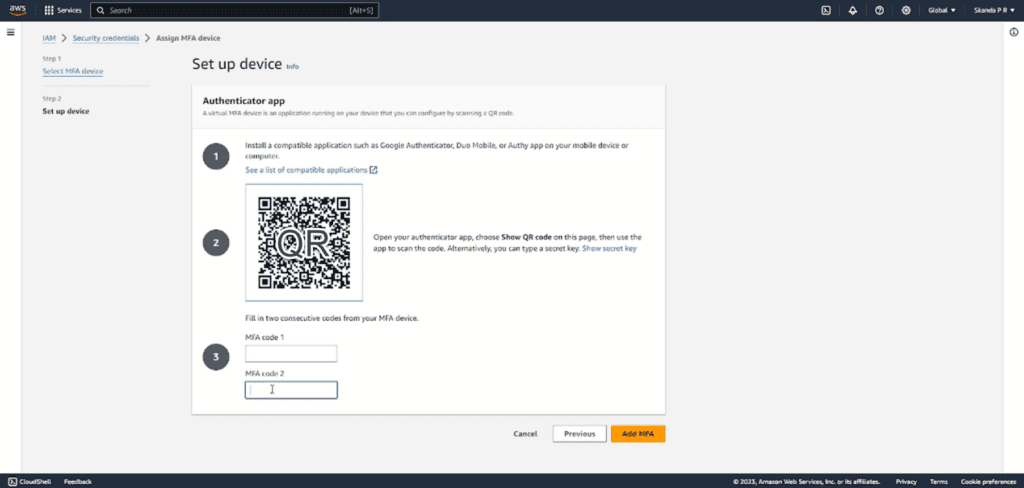
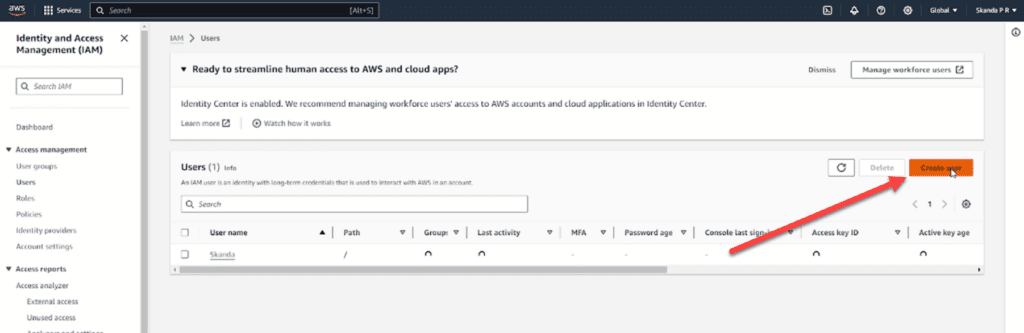
Creating an IAM user
Identity and Access Management or simply IAM, as the name implies, is a service provided by AWS, which allows you to manage access to certain AWS services and resources securely. This should be added to the user who manages the cluster.
Next, create an IAM user using the AWS IAM service and make a note of the ACCESS_KEY and the SECRET_KEY.
- In the left panel, select Policies
- Click the Add Policies button and select Create Inline Policy
- Then select JSON in the Policy Editor and paste the following:
{
    "Version": "2012-10-17",
    "Statement": [
      {
         "Effect": "Allow",
         "Action": [
           "eks:*"
         ],
         "Resource": "*"
      },
      {
         "Effect": "Allow",
         "Action": "iam:PassRole",
         "Resource": "*",
         "Condition": {
           "StringEquals": {
             "iam:PassedToService": "eks.amazonaws.com"
             }
         }
      }
  ]
}
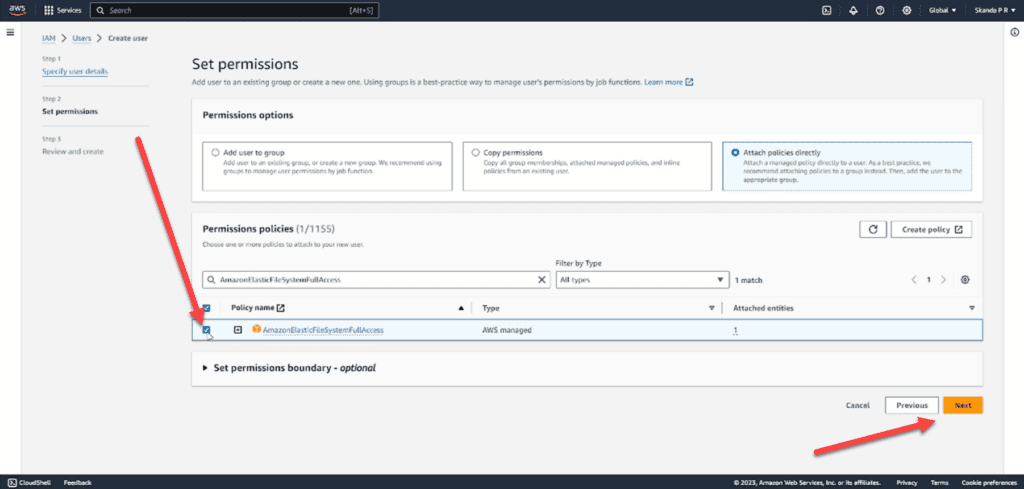
Also, search for all the policies below and add them to the IAM user as well:
- AmazonElasticFileSystemFullAccess
- AWSCloudFormationFullAccess
- AmazonEC2FullAccess
- IAMFullAccess
- AmazonEKSClusterPolicy
- AmazonEKSWorkerNodePolicy
- AmazonS3FullAccess
- CloudFrontFullAccess
- AmazonVPCFullAccess
- AmazonEKSServicePolicy
Download and configure the AWS CLI, eksctl, kubectl, helm, and git
Please Note: To proceed, you must have an ACCESS KEY ID and SECRET ACCESS KEY (see above). You may also find it useful to have the AWS Getting Started with eksctl guide available for reference. We recommend executing all the steps going forward on a Linux shell.
The following tools are required for running this blog. Install them in your PC by using the following links in case you haven´t had them already:
Once these tools are installed, open your Linux shell and use the command shown below to provide the ACCESS KEY and SECRET ACCESS KEY:
aws configureYou are all set with the pre-requisites, now let’s dive into the real deployment steps!
Deployment steps
Deploy the Elastic File System (EFS) Server
This can either be done using the AWS console service EFS or the AWS CLI and involves selecting a region and a VPC (subnets). Whichever method you choose, there are two steps to follow:
- Create an EFS in a region
- Make sure your mount targets are available for all interested availability zones
Please Note: If you don’t know which zones are needed, set all of them in the region.
Creating the EFS with AWS CLI
Follow these steps:
- Create an EFS in a region:
aws efs create-file-system --throughput-mode bursting --tags "Key=Name,Value=<EFS NAME>" --region <REGION>- Get an EFS ID:
aws efs describe-file-systems --region <REGION>The output shows “NAME” and FileSystemID.
The EFS server FQDN will be:
<EFS ID>.efs.<REGION>.amazonaws.com- Find a VPC (which should have public subnets). If you don’t know which VPC to use, you can use the default:
aws ec2 describe-vpcs --region <REGION>The output shows the VPC ID.
- Get all subnets: To get the subnets for all available zones in the region use the following command:
aws ec2 describe-subnets --region <REGION> --filters "Name=vpc-id,Values=<VPC ID>"The output shows “AvailabilityZone” and “Subnets ID”.
Please Note: You need to use VPC public subnets otherwise the pods will not be able to access the EFS server. The simplest way to achieve this is to use the default VPC which has public subnets.
Creating the mount target
Follow these steps:
- To create the mount target, use the following command:
aws efs create-mount-target --region <REGION> --file-system-id <EFS ID> --subnet-id <Subnet id>Usually, an AWS EKS cluster needs at least two available zones, so create two mount targets by running this command twice, passing a different subnet id each time (one from each Availability Zone). If, for example, we created an EFS on region us-east-1 with mount targets for all available zones, the subnet id on zone us-east-1a would be subnet-05a2f12b and the subnet id on zone us-east-1b would be subnet-9e08ecd3
- To display the mount targets you have just created, use the following command:
aws efs describe-mount-targets --region <REGION> --file-system-id <EFS ID>Keep the following EFS related information handy, as it will be needed going forward:
- REGION
- EFS ID
- Subnet IDs
- Mount target IDs
Deploy the EKS cluster with eksctl
Elastic Kubernetes Service (EKS) is a managed Kubernetes service available in AWS that can be deployed via eksctl along with the specified subnets, security groups and other configurations. This can be done with the following command.
eksctl create cluster \
     --name <CLUSTER NAME> \
     --region <REGION> \
     --nodegroup-name <NODE GROUP NAME> \
     --node-type <NODE TYPE> \
     --nodes <INITIAL NODES> \
     --nodes-min <MIN NODES> \
     --nodes-max <MAX NODES> \
     --managed \
     --vpc-public-subnets <SUBNET ID1> \
     --vpc-public-subnets <SUBNET ID2>
For the purposes of this tutorial, we are using the following setup (which can be adjusted to your own context):
- Cluster name is “hpcc-1”
- Region is “us-east-1”
- Node group name is “hpcc-workers”
- Node type “t3.medium”
- An initial deployment with 3 nodes and a maximum of 4 nodes.
- Cluster name is “hpcc-1”
- Subnet id’s “subnet-05a2f12b” and “subnet-9e08ecd3”
eksctl create cluster \
     --name hpcc-1 \
     --region us-east-1 \
     --nodegroup-name hpcc-workers \
     --node-type t3.medium \
     --nodes 3 \
     --nodes-min 1 \
     --nodes-max 4 \
     --managed \
     --vpc-public-subnets subnet-05a2f12b \
     --vpc-public-subnets subnet-9e08ecd3
Creating an EKS cluster usually takes 15 to 30 minutes. When it is done, run the following command:
eksctl get clusterDeploy the Amazon EFS CSI driver & external provisioner for Amazon EFS
This needs to be done using the AWS CLI and there are two main steps to follow:
- Install Amazon EFS CSI driver
- Install the external provisioner for Amazon EFS
Installing the Amazon EFS CSI driver
After successfully creating your cluster, it is time to install the EFS CSI driver on your EKS cluster. Follow these steps:
- Install the Amazon EFS CSI driver using the following command:
kubectl apply -k "github.com/kubernetes-sigs/aws-efs-csi-driver/deploy/kubernetes/overlays/stable/ecr/?ref=release-1.3" - The efs-csi pods should now be running. Check this using the following command:
kubectl get pods -n kube-system | grep -i efs-csiDeploying the external provisioner for Amazon EFS
Now, deploy the external provisioner for Amazon EFS by following these steps:
- As a pre-requisite, make sure your EKS cluster resources have inbound access to the mount targets by obtaining the security group information from your EKS cluster resources:
 aws eks describe-cluster --name hpcc-1 \
--query cluster.resourcesVpcConfig.clusterSecurityGroupId- Next, obtain the security group information from your mount targets:
aws efs describe-mount-target-security-groups --mount-target-id <mount-target-id>- Now authorize inbound access to the security group for the EFS mount target using the below mentioned (if the permission is already granted you will get an ‘already exists’ exception – that is ok):
aws ec2 authorize-security-group-ingress \
--group-id <SECURITY GROUP ID FROM THE MOUNT TARGET> \
--protocol tcp \
--port 2049 \
--source-group <SECURITY GROUP ID FROM THE EKS CLUSTER> \
--region <REGION>- Clone the EFS provisioner repository using git:
git clone https://github.com/kubernetes-incubator/external-storage- Using vi or any other text editor, verify and, if necessary, append the efs-provisioner service account at the end of the Role-Based Access Control (RBAC) configuration file:
cd external-storage/aws/efs/deploy/
vi rbac.yaml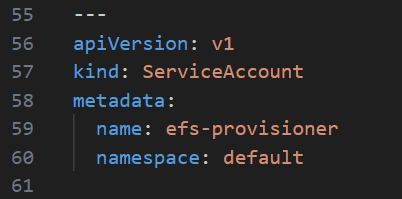
- Deploy the RBAC configuration by using the following commands:
kubectl apply -f rbac.yaml- Using vi or any other text editor, update the efs-provisioner manifest.yaml file by copying/pasting the content below and replacing the values in red with your own respective EFS ID and region values:
---
apiVersion: v1
kind: ConfigMap
metadata:
  name: efs-provisioner
data:
  file.system.id: fs-02fdd982bbf9bfac5
  aws.region: us-east-1
  provisioner.name: example.com/aws-efs
  dns.name: ""
---
kind: Deployment
apiVersion: apps/v1
metadata:
  name: efs-provisioner
spec:
  replicas: 1
  selector:
    matchLabels:
      app: efs-provisioner
  strategy:
    type: Recreate
  template:
    metadata:
      labels:
        app: efs-provisioner
    spec:
      serviceAccount: efs-provisioner
      containers:
        - name: efs-provisioner
          image: quay.io/external_storage/efs-provisioner:latest
          env:
            - name: FILE_SYSTEM_ID
              valueFrom:
                configMapKeyRef:
                  name: efs-provisioner
                  key: file.system.id
            - name: AWS_REGION
              valueFrom:
                configMapKeyRef:
                  name: efs-provisioner
                  key: aws.region
            - name: DNS_NAME
              valueFrom:
                configMapKeyRef:
                  name: efs-provisioner
                  key: dns.name
                  optional: true
            - name: PROVISIONER_NAME
              valueFrom:
                configMapKeyRef:
                  name: efs-provisioner
                  key: provisioner.name
          volumeMounts:
            - name: pv-volume
              mountPath: /persistentvolumes
      volumes:
        - name: pv-volume
          nfs:
            server: fs-02fdd982bbf9bfac5.efs.us-east-1.amazonaws.com
            path: /
---
kind: StorageClass
apiVersion: storage.k8s.io/v1
metadata:
  name: aws-efs
provisioner: example.com/aws-efs
---
kind: PersistentVolumeClaim
apiVersion: v1
metadata:
  name: efs
  annotations:
    volume.beta.kubernetes.io/storage-class: "aws-efs"
spec:
  accessModes:
    - ReadWriteMany
  resources:
    requests:
      storage: 1Mi
---- Deploy the efs-provisioner by using the following command:
kubectl apply -f manifest.yaml- You should now have an efs-provisioner pod running along with a Persistent Volume Claim (PVC) and a Persistent Volume (PV):
kubectl get pods
kubectl get pvc
kubectl get pv
Please Note: Your efs-provisioner pod should be showing a “Running” status and your PVC and PV should be showing a “Bound” status before moving forward as the HPCC Systems cluster require these for a successful deployment. If for some reason they are showing a different status, use “kubectl describe” to troubleshoot the issue and double check your rbac.yaml and manifest.yaml files for any typos.
Deploy the HPCC System platform cluster
Use the steps below to fetch, modify and deploy the HPCC Systems charts.
- First, add the hpcc helm chart repository using the following command:
helm repo add hpcc https://hpcc-systems.github.io/helm-chart/- Generate a .yaml file to customize your cluster configuration:
helm show values hpcc/hpcc > myvalues.yaml- Using vi or any other text editor update the “storage.storageClass” entries in the myvalues.yaml file to match the storage class name of the EFS provisioner. In our case “aws-efs”:

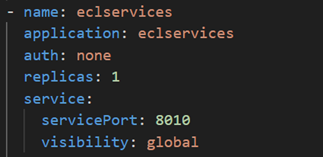
- Still within the myvalues.yaml file, make sure you update the visibility of the eclservices to “global” so that you can access ECLWatch via a web browser connected to the internet.
- Deploy the HPCC Systems Platform with the customized myvalues.yaml file:
If successful, you should see an output like this:helm show values hpcc/hpcc > myvalues.yaml - Now validate your deployment. At this point, your hpcc pods should be running. To verify this, use the following commands:
NAME: mycluster
LAST DEPLOYED: Tue Jun  8 23:04:58 2024
NAMESPACE: default
STATUS: deployed
REVISION: 1
TEST SUITE: Nonekubectl get pods
kubectl get pv
kubectl get pvcFinally, you can get ESP FQDN and check ECL Watch as follows:
kubectl get services | grep eclwatch | awk '{print$4}'You should get an output like this:
a312c7c7d80af43a290dda74d205ebcf-1061652479.us-east-1.elb.amazonaws.comNow, open a browser and go to:
http://a312c7c7d80af43a290dda74d205ebcf-1061652479.us-east-1.elb.amazonaws.com:8010/
If everything is working as expected, the ECL Watch landing page will be displayed.
Deleting the HPCC System Platform Cluster and EFS Persistent Volumes
To delete the cluster, use the following command:
helm uninstall myclusterTo delete the EFS provisioner, use the following commands:
kubectl delete -f manifest.yaml
kubectl delete -f rbac.yaml
Please Note: EFS Persistent Volumes may still exist. You can either re-use them or delete them using the following command:
kubectl delete pv <pv name>Alternatively, to delete all, use the following command:
kubectl delete pv --allTo delete the EFS-CSI, use the following command:
kubectl delete -k "github.com/kubernetes-sigs/aws-efs-csi-driver/deploy/kubernetes/overlays/stable/ecr/?ref=release-1.3"Deleting the EKS Cluster
To delete the EKS cluster, use the following command:
eksctl delete cluster <cluster name>Please Note: Sometimes certain resources may fail to delete. You can access AWS Service CloudFormation from AWS console to cleanup “Stack”
Deleting the EFS
To delete the mount targets use the following command:
aws efs delete-mount-target --mount-target-id <mount target ID>To delete the EFS use the following command:
aws efs delete-file-system --file-system-id <EFS ID>About the author

Skanda P R
Skanda P R is an undergraduate student in the Department of Computer Science and Engineering at RV College of Engineering (RVCE), Bengaluru, India (2022-2026 batch). Throughout his early graduation years, Skanda has been involved in several industry projects with esteemed organizations such as HPCC Systems, Samsung Research India, and Profitops Inc. These projects span a broad range of domains including cloud service deployments, data analytics, and machine learning. In addition to his project work, Skanda has actively participated in HPCC Hackathons and Poster Making Competitions, demonstrating his commitment to both practical and creative aspects in his field. His projects and contributions can be viewed on his GitHub repository: https://github.com/Skanda-P-R. Skanda is mentored by his professors, Dr. Shoba and Dr. Shetty, who are the coordinators of the RVCE_HPCC Systems Center of Excellence in Cognitive Intelligent Systems for Sustainable Solutions at RVCE.