How to schedule HPCC Systems Pods with Placements

Xiaoming Wang (Ming) is a Senior Consulting Software Engineer and has been with LexisNexis Risk Solutions Group since 2013. Ming is responsible for various HPCC Systems projects and builds as well as installation and configuration of the HPCC Systems platform. He also works on several cloud solutions for HPCC Systems development, such as Instant Cloud for AWS, Docker/Kubernetes, Cloud Formation as well as and many other solutions. In this blog Ming covers how to use HPCC Systems Pods with Placements in Kubernetes.
What are Placements?
In a nutshell, Placements are the ECL equivalent to Scheduling in Kubernetes.
In ECL we have a Scheduler, which postpones the running of a work unit until an event is detected via WAIT action or WHEN workflow service.
While working with Kubernetes, Scheduling refers to making sure the Pods are matched to the proper Nodes so the kubelet agent is able to run them.
Since ECL already uses the term Scheduler for certain tasks, we will refer to this process as Placements in the HPCC Systems Helm Chart. Placements are responsible for finding the best Node for a Pod. The Pods can be configured through placement to include an array of objects to form the Kubernetes Scheduler.
Supported Placements:
- Nodeselector
- Taints/Tolerations
- Affinity
- SchedulerName
- TopologySpreadConstraints
For common HPCC Systems cloud, Nodeselector, Taints/Tolerations and ToplogySpreadConstraints normally should be enough for pod placements. In this article we will focus on these items and just briefly covers Affinity and SchedulerName.
Placements format: Here is the list of pods/placement pairs. Each placement has a group of supported entries.
placements:
       -  pods [list]
          placement:
<list of nodeselector/tolerations/affinity/schedulerName/topologySpreadConstraints>
The list item in the pod can be one of the following:
- HPCC Systems component types in format: “type:<type name>”. <type name> includes dali, esp, eclagent, eclccserver, roxie, thor. For example “type:esp”
- Target, the name of an array item of the above type in format “target:<target name>” For example “target:roxie”, “target:thor”.
- Pod, “Deployment” metadata name, which usually should be from the name of the array item of a type. For example, “eclwatch”, “mydali”, “thor-thoragent”..
- Job name regular expression: For example “compile-” or “compile-.*” or exact match “^compile-.*$”
- set pod: [“all”] for all HPCC Systems components
No matter what order you use to write. The list of pods/placement pairs, and pods list placements will be processed with the priority: pod/job, target.
Terraform
The following instructions will use AZ CLI and Kubectl. For a Terraform user we list the basic steps with Terraform settings which are specified in admin.ftvars.
Prevent user pod/job scheduled master node pool
‘only_critical_addons_enabled = true’ in system node_pools which is the default.
Add Taints to user node pool
‘node_taints = [“key1=value1:NoSchedule”, “key2=value2:NoSchedule”]’ in user node_pools
Add labels to user node pool
’node_labels = {“key1” = “value1”, “key2” = “value2”} in user node_pools
Add “placements” to helm deployment
Write placements to a yaml file and reference them as ‘values=[“file1”, “file2”]’ in either hpcc{} or elastic4hpcclogs{} section.
NodeSelector
Nodeselector specifies a map of key-value pairs. For the pod to be eligible to run on a node, the node must have each of the indicated key-value pairs as labels. See the link below for more details.
https://kubernetes.io/docs/tasks/configure-pod-container/assign-pods-nodes/
Multiple “NodeSelector” will be processed with priority “pod/job”, “target”, “type” and “all” no matter how users write them.
To use Nodeselector you first need to add labels to nodes. You can use “kubectl label nodes <your node name> <key>=<value>”. But an easier way is to add key-value pairs during the node pool creation time which also will add the labels for auto scaling case.
To add labels during the AKS node pool creation use the following comment:
az aks nodepool add --labels key1=value1 key2=value2 …For example “az aks nodepool add –labels name=npone …” then you can add the following to a yaml file such as placement.yaml or hpcc/values.yaml:
placements:
- pods: ["eclwatch","roxie-workunit","^compile-.*$","mydali"]
  placement:
    nodeSelector:
      name: npone
This will generate Deployment/Job for “eclwatch”,”roxie-workunit”,”^compile-.*$”, and “mydali”
spec:
template:
     spec:
          nodeSelector:
                name: npone
You don’t need to run “helm install .. -f <placements yaml file> ”. Just “helm template … -f <placements yaml flie> < output yaml file>” then view the <output yaml file>.
Taints/Tolerations
Taints allow a node to repel a set of pods. Tolerations are applied to pods and allow the pods to scheduler onto nodes with matching taints. Taints and tolerations work together to ensure that pods are not scheduled onto inappropriate nodes. See the link below for more details.
https://kubernetes.io/docs/concepts/scheduling-eviction/taint-and-toleration/
It is important to highlight that multiple “taints/tolerations” can be “AND”ed.
To use Taints/Tolerations you first need to taint the node. For example:
kubectl taint nodes <node name> key1=value1:NoScheduleThis means that no pod will be able to schedule onto this node unless it has a matching toleration. Again, the preferred way is to taint the node during node pool creating time so it will be automatically tainted when a new node is added.
az aks nodepool add – node-taints gpu=true:NoSchedule …Then you can add the following to a yaml file such as placement.yaml or hpcc/values.yaml:
placements:
- pods: ["target:myeclccserver","type:thor"]
  placement:
      tolerations:
      -  key: “gpu”
          operator: “Equal”
          value: “true”
          effect: “NoSchedule”
This will generate a Deployment/Job for pod/job for of “target:myeclccserver” and “type:thor”:
spec:
template:
     spec:
      tolerations:
       - key: “gpu”
       operator: “Equal”
       value: “true”
       effect: “NoSchedule”
You can verify the generated yaml file with “helm template … -f <placements yaml flie> <output yaml file>” then view the <output yaml file>.
TopologySpreadConstraints
You can use topology spread constraints to control how Pods are spread across your cluster among failure-domains such as regions, zones, nodes, and other user-defined topology domains. This can help to achieve high availability as well as efficient resource utilization. See the link below for more details.
https://kubernetes.io/docs/concepts/workloads/pods/pod-topology-spread-constraints/
Multiple “TopologySpreadConstraints” can also be “AND”ed.
For demonstration purposes let’s create two node pools which have the following labels “hpcc=nodepools” and “hpcc=nodepool2” respectively. To make roxie pods evenly scheduled on the two node pools, create the following placement setting:
placements:
- pods: ["type:roxie"]
  placement:
     topologySpreadConstraints:
      -  maxSkew: 1
          topologyKey: hpcc
          whenUnstatisfiable: ScheduleAnyway
          labelSelector:
             matchLabels:
                   roxie-cluster: “roxie”
The “topologySpreadConstraints” portion will be placed under spec/templates/spec section where “maxSkew”: describes the degree to which Pods may be unevenly distributed. maxSkew must be greater than zero.
The “topologyKey”: value refers to the key of node labels. If two Nodes are labelled with this key and have identical values for that label, the scheduler treats both Nodes as being in the same topology. Pods will only be scheduled on these nodes.
The “whenUnstatisfiable”: value can be “ScheduleAnyway” or “DoNotSchedule”.
The “LabelSelector”: value is used to find matching Pods. Pods that match this label selector are counted to determine the number of Pods in their corresponding topology domain.
Affinity
Affinity and anti-affinity expand the types of constraints you can define when using nodeselector. It is more expressive and includes more control over the selection logic, such as a rule as soft or preferred and defining rules for which Pods can be co-located on a node.
https://kubernetes.io/docs/tasks/configure-pod-container/assign-pods-nodes-using-node-affinity/
Only one “Affinity” will prevail with the priority: “pod/job”, “target”,”type” and “all”
Reference this simple example to write a “affinity” in place of “nodeselector”
placements:
- pods: ["thorworker-.*"]
  placement:
    affinity:
      nodeAffinity:
        requiredDuringSchedulingIgnoredDuringExecution:
          nodeSelectorTerms:
          - matchExpressions:
            - key: kubernetes.io/e2e-az-name
              operator: In
              values:
              - e2e-az1
              - e2e-az2
For more details about Affinity usage reference this link: https://kubernetes.io/docs/tasks/configure-pod-container/assign-pods-nodes-using-node-affinity/
SchedulerName
Kubernetes ships with a default scheduler. If it does not suit your needs you can implement your own scheduler.
https://kubernetes.io/docs/tasks/extend-kubernetes/configure-multiple-schedulers/
Only one “Affinity” will prevail with the priority: “pod/job”, “target”,”type” and “all”
For example if you create a “my-scheduler” for roxie target and apply it with “kubectl apply -f <my-scheduler yaml file>” you can create following placements setting:
placements:
- pods: ["target:roxie"]
  placement:
schedulerName: "my-scheduler"
Reference above link for more usage and examples.
A conceptual example
Let’s say we want to deploy HPCC Systems on Azure with all the components on spot instances, do control the cost, but dali and sasha components. Let’s create three AKS node pools:
- A master node pool:
with taints “–node-taints CriticalAddonsOnly=true:NoSchedule”. - A Spot instance user node pool:
In AKS spot node “—priority Spot” will be automatically tainted with “kubernetes.azure.com/scalesetpriority=Spot: NoSchedule”. - A regular user node pool:
With taints “–node-taints HPCCCriticalOnly=true:NoSchedule” and label “hpcc=critical”
All above node pools prevent HPCC Systems pods to be scheduled onto them unless proper “tolerations” are added.
Here are the assignments:
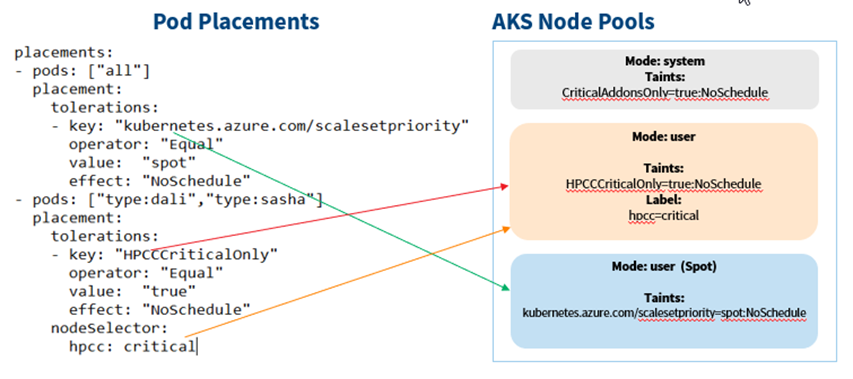
The “placements” for pods “all” will allow any HPCC Systems pod to be scheduled on any node from the “Spot” node pool. The “placements” of tolerations for pods “type:dali” and “type: sasha” will allow “dali” and “sasha” pod/job scheduled to any node from the regular user node pool. The nodeSelector “hpcc:critical” will prevent “dali” and “sasha” pod/job scheduled to “Spot” node.
You can check these without real deployment with “helm template …”.
ElasticSearch
Finally, you can write tolerations and nodeSelector to a yaml file and supply it with “-f” when running the helm command. These are pure tolerations and nodeSelector syntax and have nothing to do with HPCC Systems Helm Chart “placements”. For example, to make ElasticSearch pods deployed to Spot instances nodes, write the following to a yaml file
elasticsearch:
     tolerations:
     - key: “gpu”
       operator: “Equal”
        value: “true”
        effect: “NoSchedule”
Next, do the same for “filebeat” and “kibana”
Additional references