Optimizing the Cloud Operation Cost of HPCC Systems using Azure Spot Instance

Roshan Bhandari joined the HPCC Systems Intern Program in 2021 to complete the research he shares in this blog. At the time, he was a student at Clemson University, completing his Masters degree in computer science.
Also in 2021, HPCC Systems launched the first release of our Cloud Native platform. We are working to provide as much information as possible to help users make the change from using our bare metal version. Roshan’s contribution is particularly relevant to those who are using Virtual Machines, demonstrating how to use HPCC Systems with Azure spot instances to save a large amount of costs while running the data on Virtual Machines.
During his internship, Roshan was mentored by our LexisNexis Risk Solutions Group colleagues, Godson “Godji” Fortil (Software Engineer II) and Xiaoming “Ming” Wang (Sr Consulting Software Engineer) both with extensive experience supporting our cloud native platform development. Godji has been heavily involved in working through the cloud native setup strategies and has also released a blog covering how to Get Started Using Terraform and Azure.
Godji highlights the importance of Roshan’s contribution to our cloud native platform in these comments:
“Using leading edge application programing interfaces, programing languages and tools, Roshan was able to determine which Azure cloud region was the cheapest for a particular HPCC Systems Platform deployment based on a number of factors, which in turns greatly decreases deployment cost.”
After completing his internship and graduating, Roshan joined LexisNexis Risk Solutions as a Senior Systems Engineer in late 2021.
Please Note…
The details in this blog are designed to be used as a template for development environments. There is no guarantee that the process described will meet your organization’s cloud policies. It is advised that you speak with your site reliability engineering team to check the policies and best practice recommendations for your organization.**********************
What are Azure Spot Instances?
Azure Spot Instances are unused computing resources (Virtual Machines) owned by Azure. You can purchase the ability to use them for a much lower price compared to normal virtual machines. Azure gives these instances at a rate which can be as low as 90% below the normal instance cost, depending on region selected and size used.
While Azure may also takes the machines whenever they need them (with or without a notice), there is a work around to this covered below.
What tasks are Azure Spot Instances Suitable For?
Azure Spot Instances are suitable for tasks that are not critical to failure. The spot instances do not have service level agreements or high availability guarantees, so take that into consideration when running applications on these instances. Typically, these instances are suitable for the following workloads:
- Development and test environments
- Some HPC, Batch Processing Jobs
- Big Data Analytics and Container-based and large scale stateless applications
Can Spot Instances be used with Azure Kubernetes Service(AKS)?
In a word, yes! However, there are a couple of things to be aware of while using spot instances with Azure Kubernetes Service:
- A spot node pool cannot be a default node pool in the cluster, there must be a main node with a normal instance type.
- A spot node pool does not have a service level agreement or a high availability guarantee. Spot node pools are backed by Virtual Machine Scale Sets (VMSS), which are managed services by Azure that provide scalability options.
How to use Spot Instances
To create a spot virtual machine, there must be a resource group in a region. To create a resource group, use the following command.
az group create -n mySpotGroup -l eastusTo create a spot virtual machine, the following command can be used.
az vm create
  -- resource-group mySpotGroup
  -- name myVM
  -- image UbuntuLTS
  -- admin-username azureuser
  -- generate-ssh-keys
  -- priority Spot
  -- max-price  -1
  -- eviction-policy Deallocate
Where:
- resource-group – Specifies the resource group on which we want to create the spot vm
- name – Specifies the name of the spot virtual machine
- priority – The value spot specifically mentions the vm instance type as spot.
- max-price – Sets the spot price for price-based eviction. Setting the max-price to be -1 sets the eviction of the spot instance to be a capacity only eviction. Different eviction types are covered in more details below.
Creating an Azure Kubernetes Cluster using Spot Instances
The command to create an AKS cluster looks like this:
az aks create
  -g MyResourceGroup
  -n MyManagedCluster
  --ssh-key-value /path/to/publickey
Where:
- -g – Specifies the resource group to which we want to create the cluster.
- -n – Specifies the name of the cluster
- –ssh-key-value – specifies the ssh key pair for the cluster.
After creating a cluster, add a spot nodepool to the cluster using the following command:
az aks nodepool add
--resource-group myResourceGroup
--name nodePool1
--cluster-name myCluster
--priority Spot
--eviction-policy Delete
--spot-max-price -1
--enable-cluster-autoscaler
--min-count 1
--max-count 3
Where:
- –resource-group – Specifies the resource group
- –name – Specifies the name of the nodepool to be added to the cluster.
- –cluster-name – Represents the cluster to which the nodepool is to be added.
- –priority – Specifies the instance type as Spot.
- –eviction-policy – Specifies what to do on eviction.
- –spot-max-price – Specifies the price for price-based eviction. Using -1 on sets the instance type as capacity only eviction.
- –enable-cluster-autoscaler – enables the autoscaler
- –min-count and –max-count – Sets the minimum and maximum number of nodes in the cluster for autoscaling
How to use Spot instances with HPCC Systems
When a spot instance is up and running, use the following command to install HPCC Systems on the instance:
helm repo update
helm repo add hpcc https://hpcc-systems.github.io/helm-chart
helm install mycluster hpcc/hpcc
--set global.image.version=latest
-set storage.dllStorage.storageClass=azurefile
--set storage.daliStorage.storageClass=azurefile
--set storage.dataStorage.storageClass=azurefile
What is Eviction?
Azure spot instances are unused resources provided at a reduced price as already mentioned (almost 90% lower compared to regular instances) with no SLA and no availability guarantee. That means, when these resources are needed by Azure, they may take them back as required. Eviction is the process where Azure releases these resources.
Types of Evictions
There are 2 main types of Eviction when using Azure spot instances:
Price Based Eviction
Azure takes back the machine(s) if the price of the spot instance for a given instance size in a region is greater than the price mentioned by the user while creating the spot virtual machine.
The parameters max-price and spot-max-price in AKS are used to set price based eviction.
Capacity Only Eviction
Azure does not necessarily evict based on price. It can also evict based on the availability of resources. For example, if the spot resources which Azure has become exhausted and it needs the resources users possess. In this type of eviction, the price of the spot instance which users pay increases if the spot price increases and the price the user pays decreases when the price of the spot instance decreases. To set capacity only eviction, specify -1 in the spot-max-price in AKS.
What Happens when a Spot Instance is Evicted?
When a spot instance is evicted, the computer resources associated with the spot instance are either deleted or deallocated. You have the ability to choose delete or a deallocate in the eviction-policy parameter settings.
How Frequently Does Eviction Happen?
We have collected some metrics from the Azure Portal regarding different probabilities. Eviction rates vary from one instance to another.
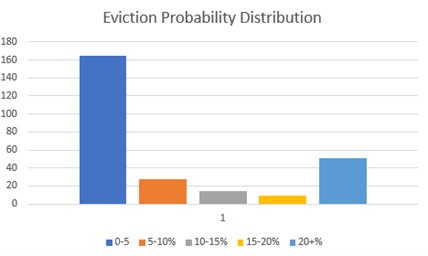
The chart above shows the variation of eviction rates and the different instance types. For example, an eviction rate of 0-5% happens in 160+ instances such as D2ds_v4, D2s_v4, D8as_v4, D8ds_v4, etc. Meanwhile the eviction rate is 20+% in almost 60 instances. These instances are D2as_v4, D4ds_v4, H16, H16m, D8s_v4, etc.
Opting in to Receive Eviction Notifications
There is a way to opt in to receiving eviction notices while creating a spot virtual machine or an AKS cluster. To receive a notification, send an HTTP GET request here from inside the virtual machine.
The URL is accessible only inside the virtual machine created and the GET request must be sent to the URL within 24 hours of creating the resource. Once a get request is received by Azure, a JSON message is sent to the URL in the event of the eviction.
To receive a message and handle eviction, a poller must be set up that will poll the URL every second. Azure typically gives notifications 30 seconds in advance.
Handling Eviction
We experimented with different situations in case of eviction here are two examples we tried:
- Moving data from inside the virtual machine
- Starting another spot virtual machine
We didn’t find any of them suitable based on the 30 seconds limitations provided by Azure, but we would like to suggest the following approach for eviction handling:
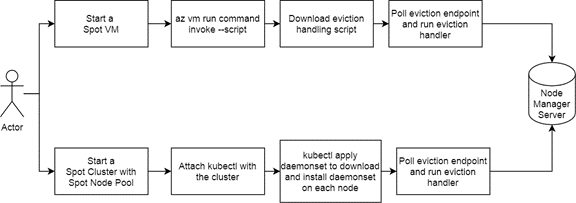
The image above shows a spot handling workflow while using a single spot virtual machine or a spot nodepool in an AKS cluster. In the 2 workflows above the top set of steps represent the eviction handling process for the Spot VM and the bottom set of steps represent eviction handling in the AKS cluster with spot node pool.
In Spot VM, use the az vm run command invoke –script “” to pull the eviction handling script inside the virtual machine and trigger when it starts. This script will constantly poll the eviction URL and once the eviction notice arrives, it can stream the eviction notice out of the machine to the node manager and restart another machine or resume a task from a checkpoint.
To handle eviction in a spot nodepool in an AKS cluster, use kubectl and apply daemonset to the download scripts for each node in the nodepool. Then poll the eviction URL for eviction notice and stream the message out to the node manager. The node manager can then add more node pools or resume HPCC Systems tasks.
Simulating Eviction for Testing
Azure provides us with 2 ways to simulate eviction.
- Using API. Send a POST request along with the proper authentication headers to this URL.
- Using Azure CLI. Below you will see an example of the code to use:
az vm simulate-eviction --resource-group resourceGroupName --name spotNameBest practices while using Azure Spot Instances
While carrying out this research, my experience helped me to develop this list of best practice guidelines:
- For long running operations, create checkpoints
- Listen to eviction notifications in the VM to get notified when your VM is about to be evicted
- If you are willing to pay up to pay-as-you-go prices, then set the Eviction type to Capacity Eviction only. In the API specify -1 as the max price, because Azure never charges you more than the Spot VM price
- To handle evictions, build a retry logic to redeploy VMs or to resume tasks from a checkpoint. If you do not require a specific VM series and size, then try to deploy a different size that matches your workload needs. I recommend to do the resume operations from another machine
- For HPCC Systems, Thor and ROXIE are better suited to use Spot, however Dali Server and Sasha Server are more suited to the the Non-Spot Node
More about this project
Students who join the HPCC Systems Intern Program are encouraged to contribute a number of resources that showcase their work to our open source community. There are other resources you can use to find out more about Roshan’s achievements:
- Read Roshan’s weekly blog journal tracking progress on this project during the summer of 2021
- View Roshan’s poster entered into the 2021 HPCC Systems Poster Contest during our 2021 Community Day Summit.
Thanks to Roshan for his valuable contribution to the HPCC Systems Open Source project. It was great to have Roshan join the team to help us learn more about spot instances and provide this information which will help others get up and running quickly. His step by step approach and helpful recommendations will undoubtedly save time and support users to navigate the process efficiently.
Lorraine Chapman, who runs the HPCC Systems Intern Program, had the following comment to make:
“Roshan did an amazing job, working well with the platform team and producing some great work which is showcased in this blog. The HPCC Systems Intern Program and LexisNexis Risk Solutions provides opportunities for students who are ready to enter the workforce having completed their studies. It’s great to see another student from the program join the RELX family and I look forward to hearing news of Roshan’s future successes.”
Read this blog to learn more about the HPCC Systems Intern Program. Career opportunities with LexisNexis Risk Solutions are posted on our website.