Introducing the Universal Workunit Scheduler
There are many scenarios where multiple dependent jobs ( workunits) need to run in a particular sequence to complete a task. Within HPCC Systems, these jobs are referred to as “workunits.” The workunit performs specific tasks on Thor (the Data Refinery Engine in HPCC Systems), such as building a keyfile, analyzing data, spraying data onto Thor, and other tasks. The Universal Workunit Scheduler provides a way to schedule one or more streams or work within HPCC Systems. More information on this topic can be found in the ‘Tips & Tricks’ section of the Community HPCC Systems Forum.
Allan Wrobel, a Consulting Software Engineer at LexisNexis Risk Solutions, introduced his work, “Introducing the Universal Workunit Scheduler” at HPCC Systems Tech Talk 33. The full recording of Allan’s Tech Talk is available on YouTube.
In this blog we will discuss:
- Cases where multiple workunits are required for one job
- The concept behind the Universal Workunit Scheduler
- ECL Functions used in the “scheduler harness”
- Demos of the Universal Workunit Scheduler
Let’s take a look at scenarios where multi-stage processing on Thor may be applicable.
What Problem is being addressed?
There are instances when multiple workunits are required to do one job. The following are examples of when multi-stage processing on Thor may be applicable:
- (E)xtraction; (T)ransform; (L)oad of data into Thor is consistently a multi-stage process, where the “scrubbing” or “transforming” of data has to wait on the extraction and presentation of its input.
- One “watcher” workunit monitors the run of another workunit while simultaneously emailing progress reports.
- Builds of retro datasets frequently require multiple builds of the same dataset. There are often compound runs of the same workunit for different dates.
- Statistics on the “process time” of a workunit cannot be generated by the “target” workunit because the job has not been completed.
The scheduler harness is able to address any instance where multi-stage processing for a job is necessary.
The Concept behind the Harness
The basic idea behind the scheduler harness is to implement each workunit as an ECL (Enterprise Control Language) FUNCTION with the harness as a wrapper around the FUNCTION. So, the harness calls the target application function, and is directed by the same function on what to do next on return from the function.
As pseudo code its:
DaisyChain (TargetApplicationFUNCTION (<NextJob>));
The only requirement to use the scheduler harness is that the “target application take the job number of the next job as a parameter to perform in the sequence and return a “Job Number”. The control is a finite state machine or directed graph. The same machine can run a parallel sequence of jobs.
Options in returning <NextJob>
The following are options for returning the next job:
- Just echo back the <NextJob> supplied as the input parameter and let the harness work out what to do next.
- Return 0 (zero). This unconditionally terminates the sequence of executed workunits regardless of any default behavior the harness may have had planned. (But NOT any workunit sequences running in PARALLEL in the same finite state machine.)
- Return a completely new/different “Job Number.” This directs the harness to start a different workunit that is specified by the defined machine. This allows sequence of workunits to be decided at run time. With this option, one has to have detailed knowledge of the finite state machine driving the run time operation of the harness.
How the return of <NextJob> is achieved in ECL
To achieve the return of <NextJob> in ECL (Enterprise Control Language), the “Target” function takes the <NextJob> identifier and returns the next job. ECL allows the user to tie an action to a returned result, with the ECL Function WHEN. This is a sequence, so this “Target” function will not return until the “action” is complete.
The code for this is the following:
TYPEOF (<NextJob>) Target (TYPEOF (<NextJob>) <NextJob>)

:=  FUNCTION

         RETURN WHEN (<NextJob>, Action);

END;
Defining a sequence of workunits
To define a sequence of work units, each job is defined by records that contain the workunit name and a string containing the ECL function that will be called, with placeholders to allow parameter passing.
The Record layout defining one workunit is:
 OneTask := RECORD

    STRING WUName;     // The 'name' to give to the workunit via the #WORKUNIT(“name”...)

    option.

    STRING eclFUNCTION; // The full path to the target application FUNCTION

  END;
Then a sequence of workunits is just a DATASET (OneTask), where the order of the records in the DATASET defines the order of execution.
Building on that Sequence
There is also the option to define PARALLEL running with a DATASET wrapper around the DATASET(OneTask). Any sequence of workunits can be run in parallel.
In pseudo code:
ParallelRuns :=  RECORD

    DATASET (DATASET (OneTask)) Queues;

End;
Macros are supplied to allocate <NextJob> identifiers and to generate initiating ECL that can be passed to …/WsWorkunits/WUSubmit to programmatically start the whole sequence.
Additional Features
Along with the mandatory place holder <NextJob>, the user can also use the <ParentWUID> place holder in either the WUName or parameter to the target ECL function. (Its type being STRING). This allows communication from parent to child workunits using:
TYPEOF(<NextJob>)TargetApplicationFUNCTION(TYPEOF(<NextJob>) NextJob,STRING ParentWUID) := FUNCTION

SomeData := DATASET(WORKUNIT(ParentWUID, '<OUTPUT Identifier>'), {STRING Somedata})[1].Somedata;
And
The machine driving the sequence of work is a directed graph or a finite state machine (fsm). The target ECL function can also take, as a parameter, the entire machine driving the sequence of work, using place holder <fsm>. Obviously this has no meaning in the WUName.
In pseudo code:
TYPEOF(<NextJob>)TargetApplicationFUNCTION(TYPEOF(<NextJob>) NextJob, TYPEOF(<fsm>) fsm) := FUNCTION
Conclusions
- This design is truly independent of and agnostic to the workings of any application.
- There is no limit to the flexibility of the harness scheduler because it is based on a state machine. For example: applications can themselves use the harness to initiate their own scheduling sequence, in effect allowing nested scheduling of workunits.
- The harness wrapper to any individual workunit runs in the same said workunit. Consequently if the workunit crashes, the wrapper is terminated as well. The machine just stops without defunct child workunits left running or EVENTs left to be de-scheduled. (Note only the individual stream stops, other streams running in PARALLEL in the same state Machine are unaffected).
It’s on the Community Forum “Tips and Tricks”
Information about the Universal Workunit Scheduler has been published on the HPCC community site “Tips and Tricks” section. Code and demos are available.
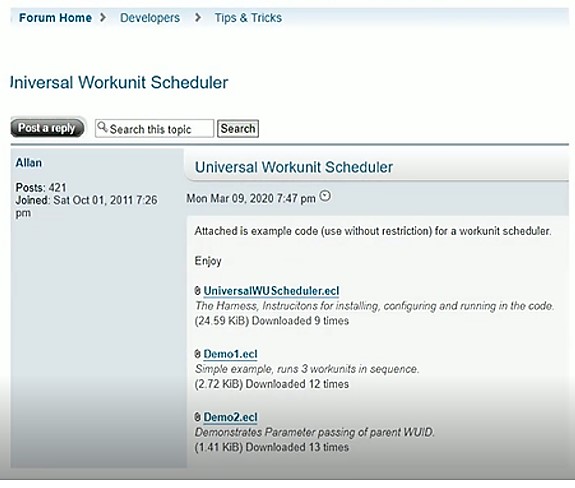
Universal Workunit Scheduler
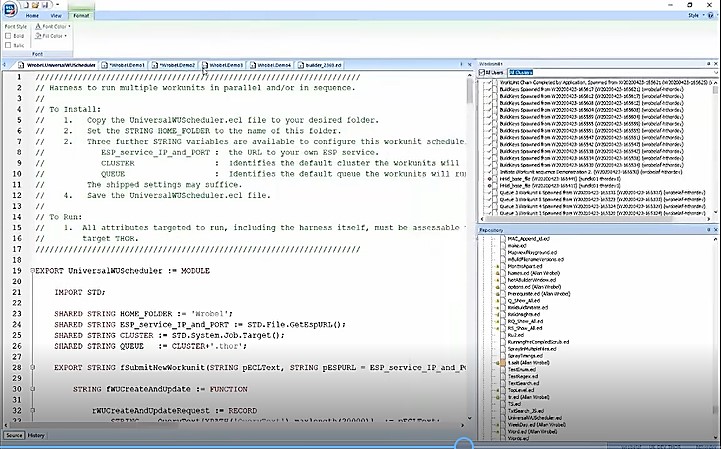
Figure 1 shows the Universal Workunit Scheduler. This module can found in the “Tips and Tricks” section of the HPCC Community Forum, under the “Developers” section.
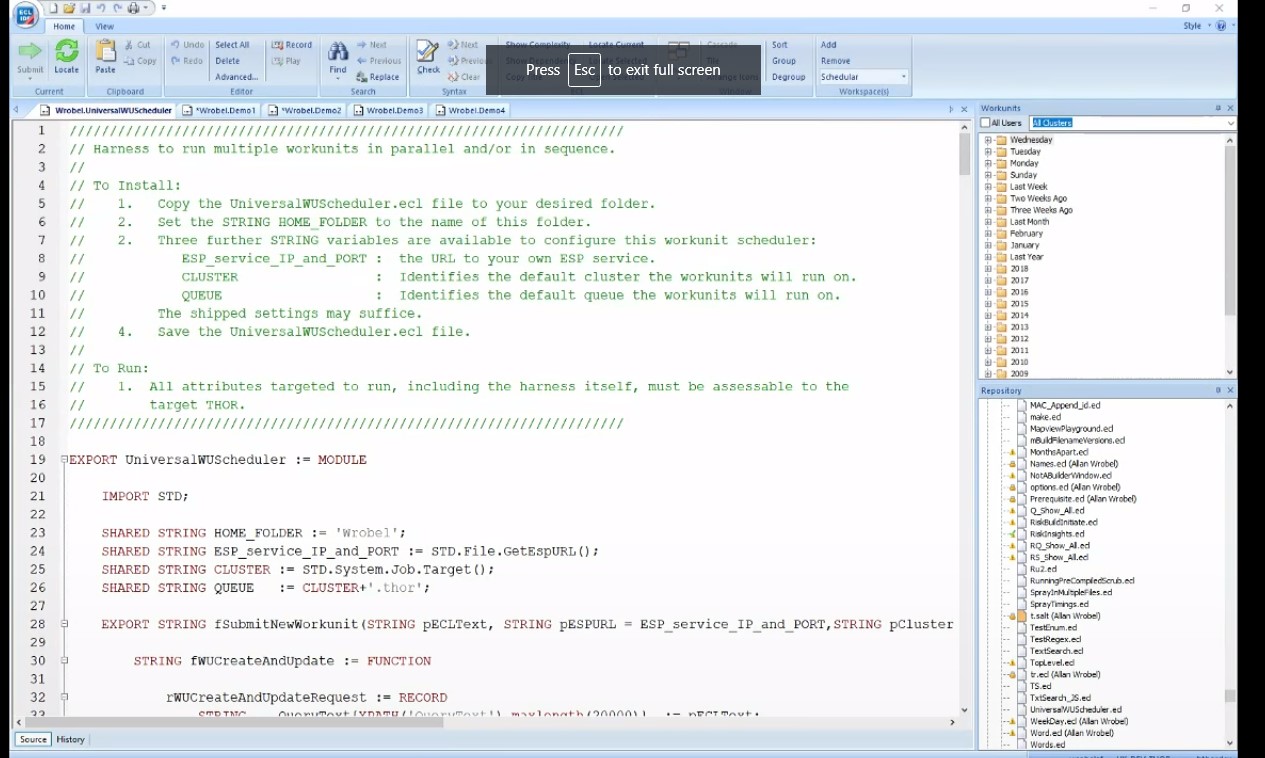
To install the harness:
1. Copy the UniversalWUScheduler.ecl file to a designated folder.
2. Set the STRING HOME FOLDER to the name of the designated folder.
3. There are three additional STRING variables available to configure for this workunit scheduler:
ESP_service_IP_and_PORT : provide the URL to your own ESP service.
CLUSTER : identifies the default cluster on which the workunits will run
QUEUE : Identifies the default queue on which the workunits will run
4. Save the UniversalWUScheduler file.
To run the harness:
1. All attributes targeted to run, including the harness itself, must be accessible to the target Thor.
Example 1: Three workunits run in sequence
The following is an example of how to run three sequences of work units in parallel. In the first queue four workunits are run. The second queue has a one minute run delay before two server workunit are run. For the third queue, there is a two minute, and subsequent workunits are run.
In the Universal Workunit Scheduler, there are macros that implement a finite state machine. Lines 26 thru 28 show the workunit sequence definition that defines what is to be done. In the first macro on line 32, the defined workflow creates a finite state machine from the workunit definition and places it in attributes finite state machine (FSM). The second macro writes initiator ECL for that finite state machine, defining “Action.” In this instance, the finite state machine (FSM) is the parameter input to this macro. The third macro on line 34 submits the “Action” to Thor to be run.
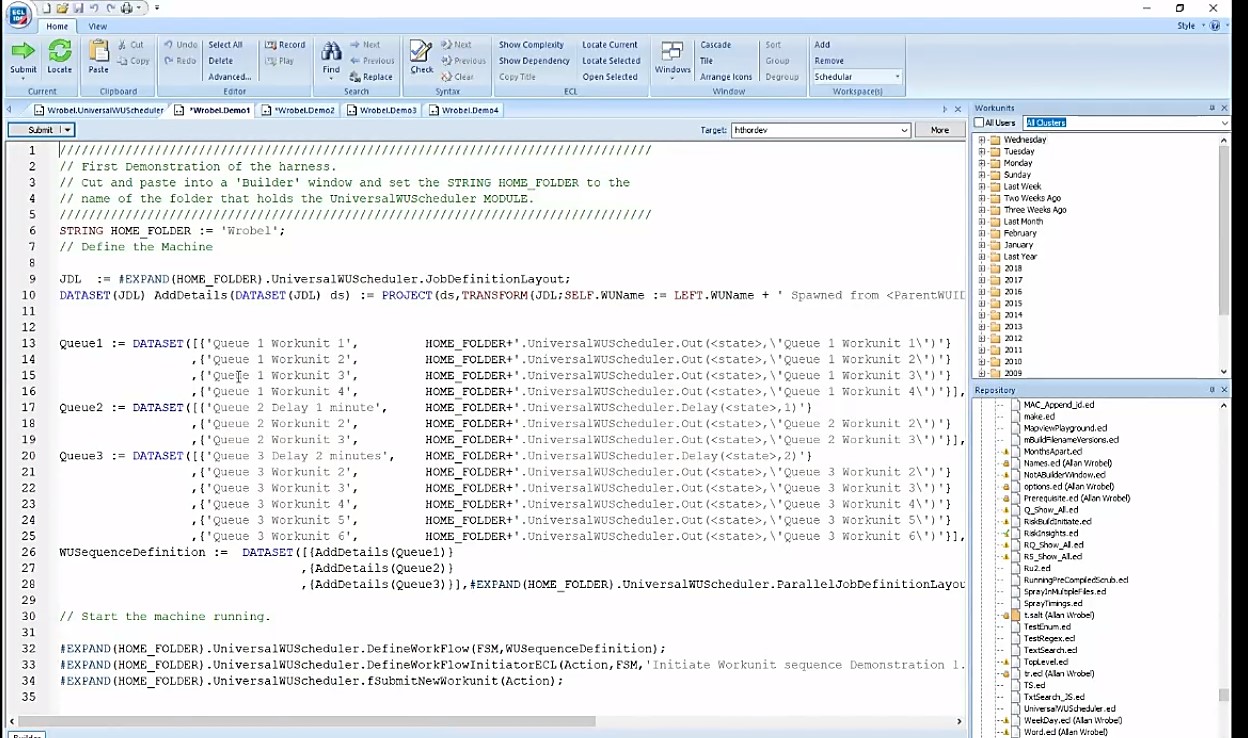
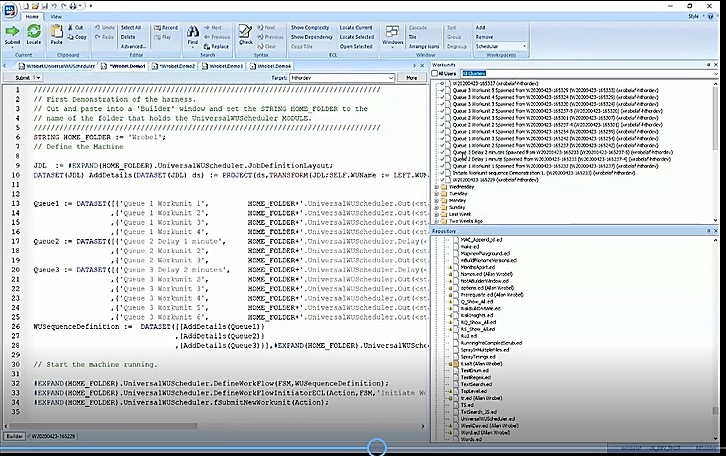
Figure 3 shows the results once the entire sequence is completed.
Example 2: Sequence of Retro Key Builds
This example (figures 4 & 5) demonstrates the use of <parentWUID> in passing a parameter from one workunit to another, and how it is the responsibility of the application to terminate the sequence of execution. This non-standard finite state machine is ideal for retro key builds.
The objective is to execute a sequence of retro key builds for rundates that are one month apart, beginning on June 4, 2017. The parameter is a “Rundate”, and in addition to performing the actual key build, the application must:
1. Detect that if the current build is the last, terminate the build sequence;
2. Increment the “Rundate” and make it accessible to its successor workunit via a name OUTPUT.
So here, the “Rundate” is passed from one workunit to another. In line 17, this workunit outputs a date for the first build, this is read by the spawned child workunit. It builds for that date and daisy-chains on, in its turn OUTPUTing an incremented build date for the next spawned child workunit to use.
It is important to get termination conditions correct because the finite state machine itself may not terminate, which can result in infinite loops. And this can potentially break Thor. Let’s look at line 16. The current job is one but the following job after job one is also one (FSM := DATASET([{1, 1}…. So, it is relying on the target function to terminate (return zero).

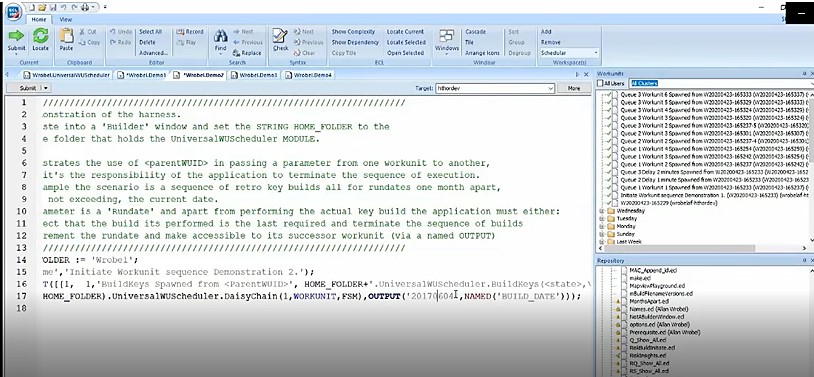
Figure 6 shows the results of the run. The termination conditions worked, and the run was successful.
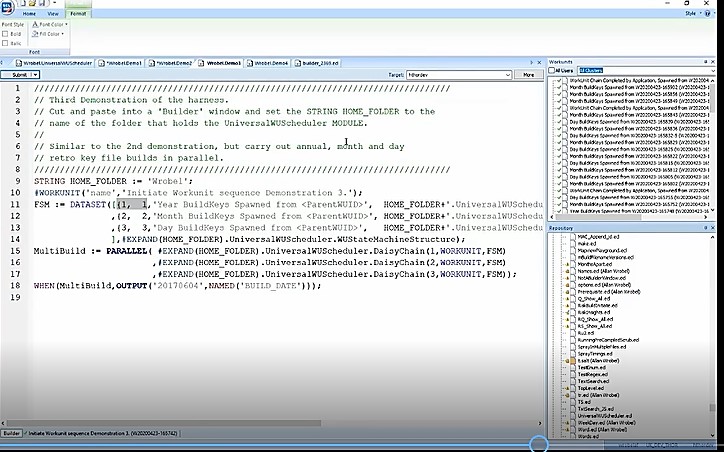
Example 3: Sequence of Retro Key Builds for Year, Month, and Day
This example (figures 7 & 8) is similar to example 2, but carries out retro key file builds in parallel for year, month, and day. Lines 11 thru 14 show the non-standard finite state machine, with key builds designated for year, day, and month.
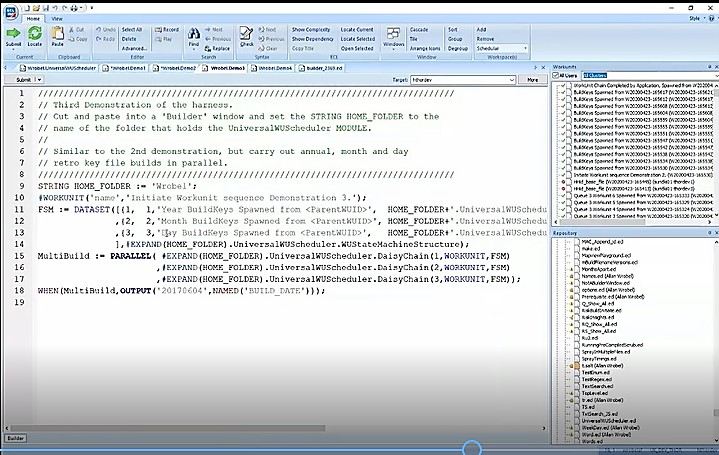
Figure 8 shows the results of the run. The termination conditions for each key build worked well, and the run was completed successfully.
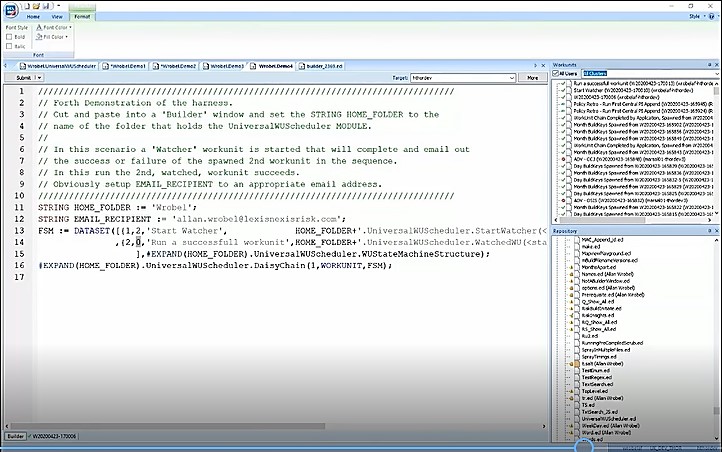
Example 4: “Watcher” Workunit
In this example, a “Watcher” workunit is launched that will complete and send an email indicating the success or failure of a spawned 2nd workunit in the sequence. In figure 9, line 11 refers to the folder where the harness has been downloaded and placed. Line 12 contains the email where notifications should be sent. On line 13 the first task is run, which is a watcher work unit (FSM := DATASET([{1, 2, ‘Start Watcher’,]… It identifies the tasks that run the actual job. On line 14, after task 2, the job terminates.
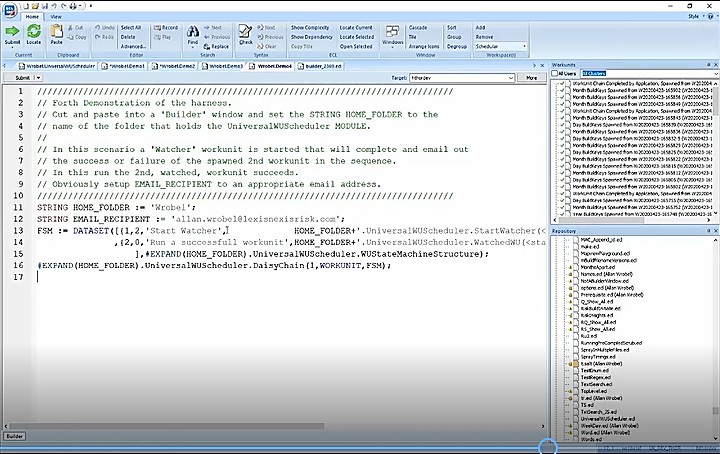
Figure 10 shows that the launch was completed and the run was successful. An email was received indicating the success of the run.
These demos, and more, can be found in the “Tips and Tricks” section of the HPCC Community Forum, under the “Developers” section, under Universal Workunit Scheduler.
Important Links
For more information on the Universal Workunit Scheduler:
“Introducing the Universal Workunit Scheduler” – The full recording of Allan’s Tech Talk is available on YouTube.
Universal Workunit Scheduler – This module can found in the “Tips and Tricks” section of the HPCC Community Forum, under the “Developers” section.
About Allan Wrobel
Allan has been working in the IT industry his entire adult life, and has had the pleasure of working with LexisNexis for 10 years now. Interests: all things programming and all things data, so this has been a marriage made in heaven.
Acknowledgements
A special thank you to Allan Wrobel for his wonderful presentation on “Introducing the Universal Workunit Scheduler,” and for his review of the information in this blog.