Installing HPCC Systems with Linkerd on Microsoft Azure
Our Cloud Native blog series provides information about development plans and the progress made on the HPCC Systems Cloud Native platform. These blogs are also a useful resource for anyone looking for guidance on how to get started, often providing step by step instructions about installation and setup. The full list of resources is available on our Cloud Wiki page, which also includes interviews with HPCC Systems developers talking about the latest progress and features included.
This blog is the result of an ongoing collaboration between the HPCC Systems open source project and a team of developers at Infosys and follows on from the blog Installing HPCC Systems with Istio on Microsoft Azure, contributed by Manish Kumar Jaychand, Technology Lead, Infosys.

Nandhini Velu (Technology Analyst, Infosys) has worked as a Thor Developer on HPCC Systems in Insurance application development for over 3 years, working extensively in the Risk and Insurance domain. Nandhini is a quick learner who loves to explore new and emerging technologies, including cloud computing. While the bare metal version of HPCC Systems can already be used in the Cloud, the development of our Cloud Native version has provided the opportunity to use her already extensive HPCC Systems knowledge and experience to explore our Cloud Native platform, which is still under active development. Nandhini has been specifically looking at how a service mesh primarily designed for microservices fits in to the scheme of things.
In this tutorial blog, Nandhini shares the steps needed to install HPCC Systems with Linkerd on Microsoft Azure. Linkerd is a service mesh for Kubernetes. It makes running services easier and safer by providing runtime debugging, observability, reliability and security without requiring any changes to code.
One advantage of Linkerd is that it is light weight when compared to ISTIO and easy to install. Also, with the latest version (Linkerd stable-2.9.3) encryption is on by default over mTLS. Learn more about Linkerd and Service Mesh.
Creating an Azure Resource Group and AKS Cluster
The first step is to create a resource group and AKS cluster on Microsoft Azure before moving ahead and downloading and installing Linkerd.
If you are new to the HPCC Systems Cloud Native platform and would like a step by step guide to installing HPCC Systems on Microsoft Azure, please read Setting up a default HPCC Systems cluster on Microsoft Azure Cloud Using HPCC Systems and Kubernetes, by Jake Smith, Enterprise/Lead Architect, LexisNexis® Risk Solutions Group.
Note: The following steps are for the Azure Cloud shell.
To create an Azure resource group, use the following code:
az group create --name rg-hpcc --location westus
To create an AKS Cluster use the following code:
 az aks create --resource-group rg-hpcc --name aks-hpcc --node-vm-size Standard_D3
 --node-count 1
Note: The size Standard_D3 is used here whereas the Standard_D2 is used in Jake Smith’s blog mentioned above. The reason for using Standard_D3 is that we need extra resources for getting the pods up with Linkerd and so a bigger size is needed.
For kubectl and helm to interact with Azure, you need to configure the kube client credentials. To do this run the following command:
az aks get-credentials --resource-group rg-hpcc --name aks-hpcc --admin
You are now ready to interact with Kubernetes in Azure.
Linkerd Installation
Linkerd has three basic components, a UI, a data plane, and a control plane. Run Linkerd by:
- Installing the CLI on your local system
- Installing the control plane into your cluster
- Adding your services to Linkerd’s data plane
Once a service is running with Linkerd, the UI can be used to inspect and manipulate it.
Note: The direct steps are shown below, please refer to the Linkerd Getting Started Guide for step by step installation.
If you are running Linkerd for the first time, you need to download the command-line interface (CLI). This CLI interacts with Linkerd, including the installation of the control plane onto your Kubernetes cluster.
Step 1: Installing the CLI
Use the following command to install the CLI manually:
curl -sL https://run.linkerd.io/install | sh
Then add Linkerd to your path:
export PATH=$PATH:$HOME/.linkerd2/bin
Verify the CLI is running correctly by running:
linkerd version
If there are any checks that do not pass, make sure to follow the provided links and fix those issues before proceeding.
Step 2: Validating your Kubernetes cluster
To check your cluster is configured correctly and ready to install the control plane run the following command:
linkerd check –-pre
The following screen is displayed:
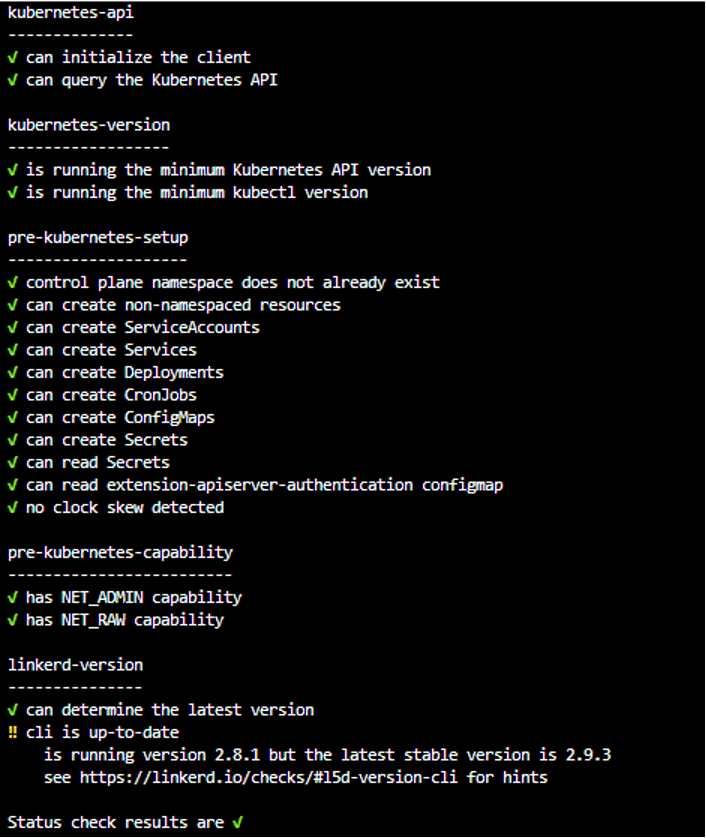
If there are any checks that do not pass, follow the links provided and fix those issues before proceeding.
Step 3: Installing Linkerd onto the cluster
Now that the is CLI running locally and your cluster is ready to go, the next step is to install the control plane into its own namespace (by default, linkerd). To do this, run the following command:
linkerd install | kubectl apply -f –
The linkerd install command generates a Kubernetes manifest with all the necessary control plane resources. Piping this manifest into kubectl apply instructs Kubernetes to add those resources to your cluster.
Validate the installation by running the following command:
linkerd check
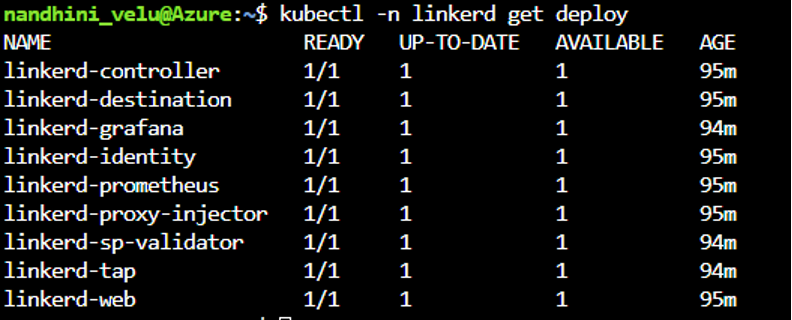
To check which components were installed, run the following command:
kubectl -n linkerd get deploy
Linkerd automatically adds the data plane proxy to pods when the linkerd.io/inject: enabled annotation is present on a namespace or any workloads, such as deployments or pods. This is known as “proxy injection” and is done using the following command:
kubectl annotate namespace default --overwrite linkerd.io/inject='enabled'
On running this command, the following screen will be displayed:

To check annotation on the default namespace, run the following command:
kubectl get namespace default -o yaml
Step 4: Installing the HPCC Systems cluster
Create the HPCC Systems cluster using the following commands:
helm repo add hpcc https://hpcc-systems.github.io/helm-chart/

helm install mycluster hpcc/hpcc --set global.image.version=latest --set storage.dllStorage.storageClass=azurefile --set storage.daliStorage.storageClass=azurefile --set storage.dataStorage.storageClass=azurefile
It will take few minutes for the pods to get into a running state and you can use the following command to check the status of the pods:
kubectl get pods
In the following screenshot, the READY column shows the 2/2 status for all the pods. One status is for the Linkerd proxy and other is the actual HPCC Systems component.

Once all the pods are running, the HPCC Systems cluster is ready to be used.
To uninject proxies, use the following command:
kubectl get deploy -o yaml | linkerd uninject - | kubectl apply -f –
To uninstall linkerd, this is the command to use:
linkerd uninstall | kubectl delete -f -
Automatic encryption in Linkerd
By default, Linkerd automatically enables mutual Transport Layer Security (mTLS) for most TCP traffic between meshed pods, by establishing and authenticating secure, private TLS connections between Linkerd proxies.
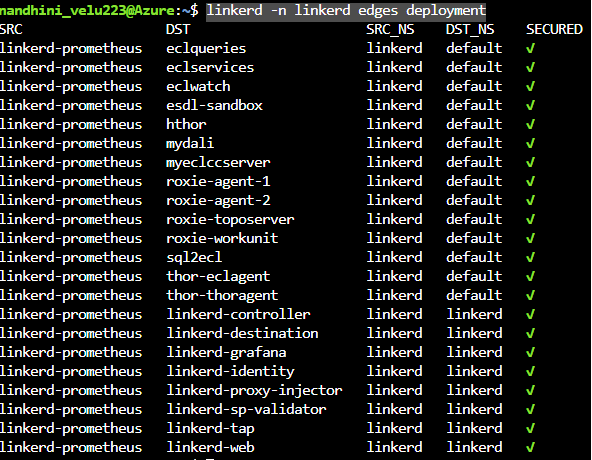
Validating mTLS in Linkerd with Linkerd edges
To validate that mTLS is working, use the linkerd edges command to view the summary of the TCP connections between services that are managed by Linkerd.
linkerd -n linkerd edges deployment
The following screenshot, shows that all the services were secured:
There are two other way to verify encryption using the methods described in the Linkerd documentation.
Having completed all these steps, you now have a working version of HPCC Systems with Linkerd.
At this point, there is a Kubernetes issue which requires some explanation. The service mesh works by adding a sidecar to the existing HPCC Systems pods. These work quite well with the pods which are spun up by default and are always ON. But there are certain pods which are spun up only on demand. For these on demand pods, once the job is done, they must be terminated. While the primary pods are terminated once the job is done, the Linkerd proxies attached to these pods remain and are not terminated along with the main pod.
The following screenshot shows the on-demand pods while the job is still in progress. The 2/2 number means that both the primary pod and the sidecar proxy are working:

Once the job is completed, the expectation is that the primary pod and side car attached to should be terminated and free up the resources. However, what actually happens is that the primary pods get terminated while the linkerd sidecars still remain and in the process, continue to consume resources.
This screenshot was taken after the job completed:

The 1 /2 number indicates that the primary pod has been terminated but the sidecar proxy remains. As a result, all resources will be consumed by proxies which were not terminated and eventually, there will be no more resources available for actual use.
This is a known issue in Kubernetes and at the time of writing, no fix or work around is available. The same issue is also experienced when using Istio, which is covered in a separate blog Installing HPCC Systems with Istio on Microsoft Azure.
If you would like to know more about this unresolved issue, the links below explain the problem in detail:
- Better support for sidecar containers in batch jobs using Kubernetes- Issue #25908
- Better support for sidecar containers in batch jobs using Istio – Issue #6324
- Sidecar Containers – Issue #753
Thank you!
Our thanks go to Nandhini Velu and the rest of the Infosys team for sharing their knowledge and experience with the HPCC Systems Open Source Community. We also thank them for their ongoing support as we work towards delivering HPCC Systems 8.0.0 (targeting early Q2), which will be the first feature complete version of our Cloud Native platform.